Blog Archives
Superman Ice Cream (Water Marbling Method – Trials and Tribulations)

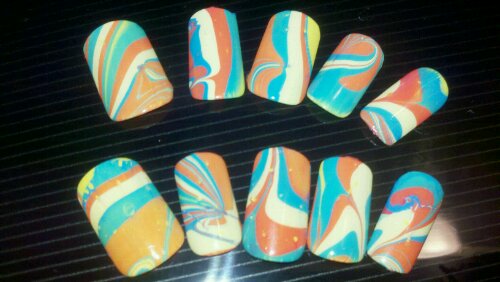

Superman Ice Cream!! Woooo!!!
Let me start this post by saying, WHAT THE HECK? WHY DO ALL THE TUTORIAL VIDEOS FOR WATER MARBLING LOOK SO EASY WHEN THIS IS THE HARDEST, MESSIEST NAIL ART PROJECT I’VE EVER DONE! AAAAHHHH! Ok, now that’s out of the way, I can say the trials and tribulations were totally worth it. And I went through MANY trials and tribulations…
First, I would recommend going on YouTube and watching videos on water marbling first before trying it for yourself but I’ll tell you about how I was able to do this successfully.
Now a list of the mistakes I learned the hard way:
1. What those YouTubers don’t tell you is that not every nail polish works well for water marbling. The ones with a gel base were way too thin once they spread out on the water and it made for a very light marbling effect, not bold like I’d imagined. And some polish formulas (I’m looking at you bright neon China Glaze polishes!) had polish drops so dense they bypassed the surface of the water and sank right to the bottom of the cup. *cue The Price Is Right Losing Horn sound* ![]() You may have to do several tests on the surface of your water before you find out which polishes in your collection will work for the water marbling method.
You may have to do several tests on the surface of your water before you find out which polishes in your collection will work for the water marbling method.
2. Create an area for your art should things get messy. All the YouTubers have done this (I noticed in retrospect) but no one explicitly says, “hey this is the messiest thing you’ve done since making paper maché masks in kindergarten!”
3. Because you’re constantly dipping the nail polish brush into the bottle to get drops, you might be tempted to not tighten the cap after every drop. I can see how you might do that. Just remember to tighten the cap when you’re all done. I did not. I picked up a bottle of Orly Blue Collar by the cap, which was not tightened, and it held for a split second then fell…onto me, my couch, a side table, and the wall…coming to rest on its side on my carpeted floor. Yep. After a short expletive-filled outburst, I cleaned up the mess with nail polish remover and created a semi-permanent nail art station on my dining room table.
4. If you’re going to do this on your own fingers, protect your finger skin with Scotch tape. There are videos on YouTube of folks doing this, but I thought “whatever, I’ll just wipe off the excess with nail polish remover”. WRONG! Nail polish can stain! After I stained my right middle finger light blue, I decided to do this entire project on fake nails. Why? A) I knew that once I got this first attempt right, I would not want to see all my hard work end up on a cotton ball soaked in nail polish remover in a few days and B) I really didn’t feel like encasing my fingers in Scotch tape for this first look.
5. Use room temperature water. I don’t know the chemical properties of polish but it only spreads out into that polish puddle if the the polish and water are the same temp…room temp.
With that said, who loves Superman Ice Cream??! I do! And I wanted to dedicate a nail post to it. So here it is…
For some reason, none of my yellow polishes were working well for this method, so my first step was 2 coats of China Glaze Happy Go Lucky (bright yellow) on the fake nails.
Once I chose and tested the colors I wanted to marble on the nails, I took a plastic cup of room temperature water and allowed 1 drop of polish to hit the surface…it automatically spread out. I kept dropping drops of the other colors in the center of my first nail polish puddle, until it looked like this…
 note the successfully dipped pre-made nail on the right…
Then I took a toothpick and lightly disturbed the surface of my polish puddle making a pattern of swirls.
 Note the closeup of the toothpick in the foreground of the pic…
Then I dipped my nail into the puddle, straight down into the water and used the toothpick to collect the remaining polish off of the surface of the water before bringing my nail out. This prevents your nail from catching more unintended polish on the way out.
Then I let the nails dry on the toothpicks, added a couple coats of top coat and voila! Superman Ice Cream-themed nails! I finished this project laaaaaaaate last night so I didn’t have enough energy to apply them. But I wanted to get this post up for all to see. I’ll post an update tonight or tomorrow of what they look like on my nails in the sun!

A pic of the colors I used—
For the marbling: Orly Blue Collar, Ole, Lemonade
For the base coat on the nails: China Glaze Happy Go Lucky
Like the look and want it for yourself? Check out the Custom Nails by The Enamelista page
Peach Rings Update
Last night, a friend — and nail art fan — commented that I should use glitter to mimic the sugar on the peach rings and I thought that was a BRILLIANT idea. I did some experimenting on my right hand and after testing out a few methods, I decided on a very thin coat of Orly Tiara on top of yesterday’s mani. I wanted to post these pics last night but I had a feeling that sunlight would show it off better and I was right. 😀 I think the glitter mimics the sugar pretty well and it also adds quite a bit of shine to the overall look.

LOVE IT!
Sadly I didn’t have any peach rings for props in this photo because I ate them yesterday as soon as I was done taking pictures….
Peach Rings

Well the weather is getting warmer so it’s time to break out some brights for summer! Yesterday on Twitter, the trending topic #childhoodmemories really reminded me about all of fun and simple things that made me happy as a child. Now I’m not a huge fan of candy but I have a few favorites and one is Peach Rings.


Who remembers these?! Better yet, who still eats these?! I haven’t had Peach Rings in years but they still taste the same all these years later. For this mani, I applied a base coat then 2 coats of Orly Lemonade. Next, I applied a very sheer coat of Wet n’ Wild Fast Dry 9.0.2.1.Orange then waited until it was dry to sponge a bit more orange on about 2/3 of each nail. After that, I applied a sheer coat of China Glaze Cherry Pie on 1/3 of my nail over the 9.0.2.1.Orange and sponged more on that third once was dry. Lastly, I applied a top coat and Voila! A Peach Rings-inspired nail art design!
This manicure looks sooooo pretty in the sun, folks. I hope you enjoy!
 It’s the clllaaaawwww! With a Peach Ring!!
