Blog Archives
Mondrian-Inspired Nails

In an effort to expand my horizons, this past weekend I checked out a documentary about Charles and Ray Eames. You may not know them by name (I didn’t before Friday) but chances are great that you know the art and design masterpieces they created together over several decades. Awesome individually as an architect (Charles) and a painter (Ray), they were best known for their collaborative efforts which led to these popular, innovative, relatively affordable chair designs. Their motto: The best for the most for the least. Here are a few examples….

Ok, whose grandparents had this chair/ottoman set? I’m pretty sure mine did.

The chair present in every doctor’s office in the 1980s…

And you haven’t lived until you’ve napped in one of the Eames’ tandem chairs commonly used in airports…
But what struck me most about the documentary of the lives of the Eames was their house. When an architect and an artist get married and design their own home, beauty ensues. I dedicate my manicure to this…


Here is more information about the history Eames house, also known as Case Study House #8.
For this manicure, I used one coat of Essie Ballet Slippers, a very pale pink, to provide a neutral background for this take on a stained glass nail effect. I used a black Kiss Nail Artist brush to paint the lines. Instead of the primary colors the Eames used, I chose some pretty fall colors for this manicure (Thanks Mom!). I, at random, filled in squares with China Glaze Ruby Pumps (microglitter red), Orly Fowl Play (deep purple with orange and red glitter), Wet n Wild Fast Dry 9.0.2.1.Orange (shimmery orange/gold), and Orly Luxe (metallic gold).
If you get a chance, check out this article about the Eames documentary and see if your local independent theater is screening it. Education and inspiration in one interesting film…
UPDATE 11-22-11: A modern art enthusiast and Twitter friend has given me more info on the inspiration behind the design of this house. Piet Mondrian was a Dutch painter who created this painting and other similar works of art:

The Eames were inspired by his work while designing their house and I was inspired by the Eames. For more info about Mondrian, check out this Wikipedia entry. For that reason, I’ve changed the name of this post to give credit where credit is due.
Work Appropriate with a little Sparkle

Fun fact: I actually have a regular job in a regular office complete with my humble abode of a cubicle. While our work style of dress would best be described as business-casual, I’m fortunate to work in a department that is relatively free-spirited when it comes to self expression in the form of nail colors. I haven’t worn any of the stiletto nails to work because I can’t type with them, but I get compliments all the time and many of my coworkers watch out for the days when I come to work with a new nail design.
I realize that many women work in more conservative work environments and are limited to nude and neutral shades for their fingernails. To these women, I say wear some closed-toe shoes and rock some crazy colors on your toenails! But on your fingernails, there may still be ways to sneak in a little bit of pizazz. This nail look was pretty much stolen from one of my nail diva high school classmates I saw this past weekend during my 10 year high school reunion (*gasp* I’ve revealed my age!). The restaurant was dimly lit but her nude polish with a glitter accent finger really appealed to me. So I stole it…she knows I had plans to steal it though 😀
If you’ve scrolled through my blog, you’ll see that the great majority of my designs are not conservative-workplace-appropriate but I hope you nail divas with constraints can try this look.
I painted all but my index fingers with Essie Ballet Slippers, a very pale and sheer cool pink color. It actually took 4 coats for me to get it this opaque :-|. This required a great deal of dry time between coats to avoid bubbles later. Sorry folks, I’m not a sheer polish fan but I love this color and it’s been sitting in my collection for months waiting to be used for the first time. For my index fingers I used 2 coats of Orly Tiara, my go-to silver microglitter polish, and 2 coats of Sally Hansen Extreme Wear Set the Stage, a clear top-coat based polish with large gold hexagonal glitter pieces and smaller gold microglitter pieces. I topped it all off with CND Super Shiney because I don’t think my nails could’ve taken the thickness of my normal Seche Vite.
So what do you think? Do you think you could get away with this bit of pizazz? Maybe on a Friday?
P.S. Here’s the manicure I rocked for my high school reunion last weekend. I kept it simple. Two coats of Essie Shift Power, a gold polish that is neither creme nor a true shimmer but awesome, and thin stripes with my black Art Deco Nail Art Striper.

Optimus Prime-Inspired Manicure

Transformers is huge right now with the recent release of the 3rd movie installment ‘Dark Side of the Moon’. I still remember the Optimus Prime of old, though…when he looked like this.

I guess the creators of this millennium’s Transformers series thought ol’ Optimus needed an updated paint job because now he looks like this.
![]()
Well I love makeovers and I’m a fan of the red-blue flame look. The following picture (a real life rendering of Optimus Prime in his ‘disguise’) gave me inspiration for this manicure.

For this manicure I used the following colors:
Base color: China Glaze Jitterbug (gunmetal)
Red/Orange: Wet n Wild Fast Dry 9.0.2.1.Orange, Wet n Wild Fast Dry Everybody Loves Redmond, Essie Forever Young, China Glaze Phat Santa [I used 9.0.2.1.Orange as the base color the sponged on the other 3 colors one after the other in order to create that fade from orange to dark red]
Blue Flames: Wet n Wild Fast Dry Saved by the Blue
Aaaaaand it’s an Enamelista Signature mani so it looks different dependent upon the angle you view my hands. I hope I did Optimus Prime proud. Transformers was one of my favorite cartoons growing up. 😀


Mani Party!
I went to my first Mani Party last weekend with a few fellow nail fans and it was fantastic! Desiree Mattox, chemist and expert in cosmetic science (envielabs.com), supplied us with a wonderful hand soak, scrub, and moisturizer. She even does custom cosmetics for your specific skin type and custom fragrances using all natural ingredients! Check out the link above!
After the hand and nail pampering, the polishing began! Check out all the fun designs below!

Contrast color ring finger with a J in rhinestones

Summer mani with polka-dotted ring fingers

French manicure with an alternative color scheme and Crackle on the thumbs
 The turquoise and gold signature manicure
Girl talk + Manicures = Fun Times 😀
The Enamelista’s Signature Manicure

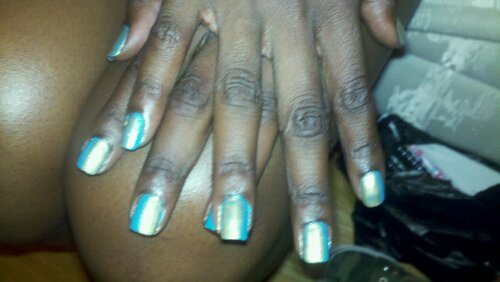
So I was headed to a BBQ Sunday evening but I really needed to redo my nails. I didn’t really have time to research and execute a brand new look so I looked at the bracelet I planned to wear and that was all the inspiration I needed. I quickly painted a design that looked different based on the angle using colors that best matched the bracelet. And with that, I think I’ve found my personal “Signature Manicure”. I love creating the illusion of 2 (or 3) different looks in one design based on the angle at which it is viewed!


So for this look, I used Orly Bailamos for the base color (teal), then Essie Shift Power (gold) on one side of my nail. I sponged Orly Luxe (another shade of gold) on the line separating Bailamos and Shift Power then included a stripe of Art Deco Gold Glitter on the golden side just to add a little pizazz. I think turquoise and gold make a good color combo!
P.S. I’ve been thinking of doing a swatch gallery–to paint my nails with every color I own once and taking pictures to document them all. But the thought of doing 80 or so manicures feels like such a daunting task…I’ll have to keep you guys posted. Below is an example from a loooong time ago, way before this blog was even thought about. The color is OPI A Good Man-darin Is Hard To Find.

Method and Products for a Long-Lasting Manicure

Alpha and Omega…of a manicure
More so than any other question about my nails, I’m asked what makes a long lasting manicure. If you’re willing to pay extra money at select nail salons, you may want to opt for Soak-Off Gel Polish (the pros and cons are described in detail here on All Lacquered Up). There are several companies that make it but most are familiar with the OPI brand, who makes a line called Axxium Soak-Off Gel Polish. Another option that is growing in popularity is CND (Creative Nail Design) Shellac, which is a hybrid of soak-off gel polish and regular polish (as described here on All Lacquered Up). As both of these methods require the use of UV light to dry the nails and the application techniques require skilled hands, these options are best left to the professionals AND they are much more costly than a traditional manicure. But the advantage is you’ll have a long-lasting, chip-free manicure for 2 (maybe even 3) weeks.
I will admit, I haven’t tried either of these methods because I like to change my nail color every 2-4 days, but I’ve heard only good things about them. However, Soak-Off Gel Polish/Shellac isn’t for everybody…so what’s a do-it-yourself nail diva to do for a long-lasting manicure? In the past year, I have tried several methods and I’ve got it narrowed down to 3 steps if you use the right products…
1. A good base coat. Much like a house needs a strong foundation, you need a good sticky base coat to create the bond between your nail and the nail polish color of your choice. I’ve been using CND Stickey (yep, it’s spelled Stickey) lately just to test it out and it seems to be doing well. But Orly Bonder is my tried and true, go-to base coat and I feel it is the best if you’re looking for longevity from your manicure.
2. A professional-brand nail polish color. There are LOTS of drug store brand polishes out there that are much less expensive than the more popular professional brands (OPI, Orly, China Glaze, Essie and Zoya–if you’re vegan). But drug-store brands just don’t cut it if longevity is your goal. Sure the colors are cute and the price is cheap, but generally the formulas are not made to last. A good professional-level brand really does the trick when applied with 1 thin coat of your color on top of the base coat then once that’s dry, another thicker coat of the color. I picked up the 1 thin, 1 thicker method of nail color application method after observing professional nail techs and I believe it creates a smooth, fast drying, but highly pigmented result. If you’re not a fan of paying up to $8.50 per bottle for nail polish, I would suggest checking out sites like www.retailmenot.com for coupons at stores like Ulta or your local drug store (if it carries professional brands). OR you can check the clearance shelves at Ulta, Sally Beauty, etc for reduced-price, off season or discontinued colors. I just picked up Orly Star of Bombay and Honeymoon In Style at Sally Beauty this past weekend for $1.99 each! Completely random finds, but totally worth it in my humble opinion. 😀
3. A good fast-drying top coat. No one likes sitting around watching paint dry, but I know we all hate the telltale signs that you didn’t wait long enough…smudges, imprints, dents, and the like. As I have yet to perfect the methods for fixing mess-ups, I’m promoting prevention–I suggest Seche Vite Dry Fast Top Coat. Seche Vite not only creates a shiny, hard exterior for your manicure but it also dries really hard in about 10 minutes. I’ve even brushed my nails softly by mistake after about 5 minutes with no smudging. It’s really good stuff. If you *really* want to speed up the process add 1-2 drops of Essie Quick-e nail drying drops to each nail and the drying time will be SIGNIFICANTLY cut down. Quick-e nail drying drops may or may not be from the Wizarding World of Harry Potter…I won’t be asking Essie too many questions about the formula…
1 other method/product recommendation you can try: If you’re looking for a long-lasting manicure that won’t get dull over time, use CND Super Shiney Top Coat (yep, Shiney). It is fantastic for that “just left the nail salon” shine but you must apply it every 2 days! I learned this the hard way. ![]() I wouldn’t suggest applying Seche Vite every 2 days because the formula is pretty thick and you don’t want layers upon layers of top coat on your manicure when it comes time to remove it. But CND Super Shiney is purposefully thin and applying Super Shiney every 2 days won’t give you a Super Thickey manicure over time.
I wouldn’t suggest applying Seche Vite every 2 days because the formula is pretty thick and you don’t want layers upon layers of top coat on your manicure when it comes time to remove it. But CND Super Shiney is purposefully thin and applying Super Shiney every 2 days won’t give you a Super Thickey manicure over time.
*BONUS* If your nails are longer than your nail bed, you can try the method of “Wrapping The Tips” which is to apply the base coat and 1st coat of color as you normally would, then apply the 2nd coat of color and top coat a bit on the underside of your nail. Go ahead and open up a new internet tab and head on over to All Lacquered up again for a detailed description of this method. I’m not adept at this method because I like to keep my nails short. Short nails were required when I played the viola in symphony orchestras and string ensembles from elementary school to the end of high school. As an adult, I just don’t like the feeling of long nails. *shrug*
Now if you follow these steps–and you don’t work in a field where your nails are constantly assaulted–you can get up to a week out of your at-home manicure with no major chipping. That said, if you like to get salon manicures weekly, do not be afraid to take your own products! Whenever I get a salon mani/pedi, I hand the nail tech my Orly Bonder and Seche Vite Fast Dry Top Coat and they don’t even blink anymore. Sometimes I even bring my own nail color unless I see something in the shop that I like better or have been meaning to buy for myself. I have yet to ask for a discount for bringing my own products though……
SO I’ve only gotten one lonely suggestion for my 1st Nail Art Challenge/Contest post. :`-(! BUT I’m feeling generous because my birthday is this week SO I used the Sally Beauty Club coupon I earned for the month of April to snag an extra bottle of Orly Bonder this past weekend. If you make a suggestion for my contest, you just might win both Orly Bonder (my go-to foundation) and Essie Quick-e (my “I’M IN A RUSH” final step)…THESE ARE THE ALPHA AND OMEGA OF A MANICURE…according to me. 😀 That’s the prize pack as it stands right now so click the link above and enter my contest dag nab it! I’m bribing you! Sheesh!
P.S. I’ve been regularly reading the All Lacquered Up blog for about a year now and the lady who runs it has taught me most of what I know. Definitely bookmark it in addition to my blog of course!
Neon + Shatter + Matte
 In fashion, I most admire the designers and stylists that are able to combine more than one trend in a single look while keeping it from looking ridiculous, i.e. mixing floral and stripe patterns or purposeful color clashing. You have to have a keen eye to make sure your clashing looks well-planned/chic and not thrown-together/tacky. As I’ve been studying up on nail trends for the summer, OPI’s Shatter polishes (along with China Glaze’s Crackle, etc.) are holding on to their popularity among nail artists and nail polish fans alike and neons are popular again for Summer 2011, especially those with a very fine micro shimmer or creme finishes. But Zoya’s Mod Matte Summer Collection caught my eye because they’re a matte finish unlike every other major polish brands’ summer collection that I’ve seen. While I love Zoya’s colors (and will probably end up picking them up eventually) I decided to go the cost savings route for this mani.
I wanted to combine the OPI Shatter Movement (yes movement), the neon summer nail color trend, and the matte finish trend. After A LOT of experimenting on practice nail tips and my own nails, I settled on this half-and-half design. I applied a base coat, then one coat of China Glaze White on White because it’s a good base for neon polishes. Next, I painted half of each nail with China Glaze Shocking Pink and the other half with China Glaze In The Lime Light. It took 2 coats on each side to get the opaque color you see in the picture. Next I applied one coat of OPI Silver Shatter diagonally across one half of each nail then followed with one coat of OPI Black Shatter on the other diagonal half. Interestingly, all 4 of these colors dry with a matte finish, but to add an extra layer of protection, I finished with one coat of Essie Matte About You.
Does it kind of look like a girly graffiti to anyone else? 😀
From what I read, matte finish polishes and top coats don’t last nearly as long as high gloss finishes so I won’t be sad if this starts chipping sooner than I’m used to. For now, I’m loving it.
P.S. After MUCH trial and tribulation, I can say with confidence that OPI Silver Shatter does not apply the same way as OPI Black Shatter. It took a slightly thicker coat than the Black Shatter for the shatter effect to actually take place. I have to wonder if the shimmer within it is an indicator that a different formula was used….has anyone else bought and tried the Silver Shatter yet?
 It’s the claaaawww…agaaaaaiiiin…because no one’s given me ideas for a good way of showing all five nails yet…*hint*
My Collection
There are two reasons why I felt now was a good time to post pictures of my collection.
1. Yesterday, I almost bought a color that I already owned. Something about the color in my hand seemed familiar and I’m glad I put it back before buying it because I would’ve been quite disappointed once I got home. It has come to a point where I actually don’t know what I own and what colors I’d still like to add to my collection. Time to reorganize my nail polish collection, eh?
2. Also yesterday, @OPI_PRODUCTS on Twitter asked its followers “What does your collection look like?”. I’ve only been really interested in keeping up with nail trends/collections for a little less than a year, but in the last 6 months my collection has exploded. Here’s a little photo timeline of my collection over the past six months.
December 2010
I had just gone from keeping my nail polishes in my linen closet on a little tray to a plastic shoe box. I was so proud of myself!

But by March 2011 one shoe box was no longer enough. I had also begun amassing lots of other supplies (nail polish remover, q-tips, fabric, etc) that could not be contained in 1 shoe box.
 This was a mess, so I bought one more plastic shoe box to solve the overcrowding problem.
By April 2011 even 2 plastic shoe boxes wasn’t enough, so I found these little shelving units and bought 3 of them.
 While they were effective at storing my nail polish, they were not good for displaying them because I had to pull each drawer completely out of the frame to see all the polishes.
Sooooo after watching some YouTube videos on how other nail polish addicts keep their polishes organized, I decided on two 3-tiered cabinet shelving units from Bed, Bath, and Beyond to display my collection.
Here it is as of 5-9-2011 😀
 I set them all up on a side table next to my couch. I actually had to stand up on my couch and shoot this picture downwards to get everything in the shot.
 Here’s a pic from the front.
 And from the back…Look I have more space!
Row #1 – Base coats, top coats, nail treatments, glitter top coat, shatter top coats, nail art stripers
Row #2 – Orly (16)
Row #3 – Essie (5), OPI (8 full size, 3 minis), 7 Wet n’ Wild Fast Dry
Row #4 – China Glaze (20)
Row #5 – China Glaze (8), Nina Ultra Pro (1), Ulta Professional (2), Barielle (1), Wet n Wild Megalast (1)
What’s not shown? My supplies — nail polish remover, foil for glitter polish removal, lace, tulle, nail clippers, nail files, nail polish thinner for reviving old polishes, paintbrushes, dotting tools, etc.
In the end, I had to make some tough cuts. Many of the non-professional, drug-store brand polishes were left in a plastic shoe box. I only anticipate using those colors if I need extra detailing for nail art.
So how do you display your collection??
